前回は、LAMP環境のWebサーバ「A」であるApache HTTP Server、DBサーバ「M」であるMySQLをLinux(CentOS)へインストールしました。
Apache HTTP Serverの記事はこちら⇒LAMP構築-Linux(CentOS)へRPMパッケージからMySQLをインストール
MySQLの記事はこちら⇒LAMP構築-Linux(CentOS)へApacheをソースコードからインストール
今回は前回に続き、LAMP環境の言語「P」である「PHP」をLinux(CentOS)へインストールします。
なお、今回のバージョンは以下です。
- CentOS-6.4-i386
- PHP 5.5.1
- Apache HTTP Server 2.4.6
PHPのダウンロード
PHP公式サイトよりPHPダウンロードミラーサイトのURLをコピーする。
今回の場合は、「tar.gz」形式を選択したので、「http://jp2.php.net/get/php-5.5.1.tar.gz/from/jp1.php.net/mirror」であった。
URLをコピーしたら、圧縮ファイルをダウンロードし、解凍する。
#PHPのダウンロード
$ wget http://jp1.php.net/get/php-5.5.1.tar.gz/from/this/mirror

#圧縮ファイルの解凍
$ tar xvzf php-5.5.1.tar.gz

#ディレクトリ移動
$ cd php-5.5.1
PHPのインストール
続いて、PHPをインストールする。
インストールに必要なもので「libxml2」がなくてエラーとなったので、インストールした。
なお、オプションはApacheとMySQLを使用するので、以下のオプションをつけた。
俺の環境では、「–with-mysql」オプションで、ヘッダーファイルなどのパス「/usr/include/mysql」を指定してもエラーとなったので、何も指定せずに実行した。
- 「–with-apxs2」…Apache 2.0用。Apache apxsツールのパスを指定。
- 「–with-mysql」…MySQLサポートを含める。MySQLベースディレクトリを指定。
- 「–with-zlib」…ZLIBサポートを含める。
- 「–enable-mbstring」…マルチバイト文字サポートを有効化。
#「configure」を実行し、Makefile生成
$ ./configure --with-apxs2=/usr/local/apache2/bin/apxs --with-mysql --with-zlib --enable-mbstring
…
(省略)
…
Configuring extensions
…
(省略)
…
configure: error: xml2-config not found. Please check your libxml2 installation.

#「libxml2」の検索
$ yum search libxml2
Loaded plugins: fastestmirror
Loading mirror speeds from cached hostfile
 * base: ftp.nara.wide.ad.jp
 * extras: ftp.nara.wide.ad.jp
 * updates: ftp.nara.wide.ad.jp
======================================= N/S Matched: libxml2 =======================================
libxml2-python.i686 : Python bindings for the libxml2 library
libxml2-static.i686 : Static library for libxml2
libxml2.i686 : Library providing XML and HTML support
libxml2-devel.i686 : Libraries, includes, etc. to develop XML and HTML applications
perl-XML-LibXML.i686 : Perl interface to the libxml2 library
python-lxml.i686 : ElementTree-like Python bindings for libxml2 and libxslt

  Name and summary matches only, use "search all" for everything.

#「libxml2」のインストール
$ yum install libxml2

#「libxml2-devel」のインストール
$ yum install libxml2-devel
気を取り直して、再度実行する。
何やら警告メッセージ「時刻のずれを検出. 不完全なビルド結果になるかもしれません.」が出たが、気にせずインストールを実行した。
#再度「configure」を実行し、Makefile生成
$ ./configure --with-apxs2=/usr/local/apache2/bin/apxs --with-mysql --with-zlib --enable-mbstring

#makeコマンドでコンパイル
$ make

#makeコマンドでテスト
$ make test

#makeコマンドでインストール
$ make install

#PHPバージョン確認
$ php -v
PHP 5.5.1 (cli) (built: Jul 15 2013 14:48:39)
Copyright (c) 1997-2013 The PHP Group
Zend Engine v2.5.0, Copyright (c) 1998-2013 Zend Technologies
インストールとテストはめちゃくちゃ時間かかったが、無事に終了した。
設定ファイルは、「/usr/local/lib/php/php.ini」のよう。
ソースのディレクトリ内には、開発用の「php.ini-development」、本番用の「php.ini-production」が用意されており、コピーし、編集して使用すればいいみたい。
なお、Apache HTTP Serverをインストールする前に「Perl」をインストールしていない場合、どうも「/usr/local/apache2/bin/apxs」の1行目のパスが正しくないようなので、修正してやる必要がある。
修正していない場合、以下のようなエラーになるので、修正してやる必要がある。
#「configure」を実行し、Makefile生成
$ ./configure --with-apxs2=/usr/local/apache2/bin/apxs --with-mysql --with-zlib --enable-mbstring
…
(省略)
…
Configuring SAPI modules
…
(省略)
…
Sorry, I cannot run apxs.  Possible reasons follow:

1. Perl is not installed
2. apxs was not found. Try to pass the path using --with-apxs2=/path/to/apxs
3. Apache was not built using --enable-so (the apxs usage page is displayed)

The output of /usr/local/apache2/bin/apxs follows:
./configure: /usr/local/apache2/bin/apxs: /replace/with/path/to/perl/interpreter: bad interpreter: No such file or directory
configure: error: Aborting

#apxsファイルの編集
$ vi /usr/local/apache2/bin/apxs

#1行目を編集
#!/replace/with/path/to/perl/interpreter -w
↓
#!/usr/bin/perl -w
Apache HTTP Serverの設定
続いて、Apache HTTP ServerでPHPを使用するために、以下の設定を行う。
まずは、「http.conf」ファイルの編集を行う。
#「httpd.conf」の編集
$ vi /usr/local/apache2/conf/httpd.conf
編集内容はこちら。
#
# Dynamic Shared Object (DSO) Support
#
# To be able to use the functionality of a module which was built as a DSO you
# have to place corresponding `LoadModule' lines at this location so the
# directives contained in it are actually available _before_ they are used.
# Statically compiled modules (those listed by `httpd -l') do not need
# to be loaded here.
#
# Example:
# LoadModule foo_module modules/mod_foo.so
#
LoadModule php5_module modules/libphp5.so
#
# DirectoryIndex: sets the file that Apache will serve if a directory
# is requested.
#
<IfModule dir_module>
DirectoryIndex index.html index.php
</IfModule>
#
# PHP Configuration
#
<FilesMatch "\.ph(p[2-6]?|tml)$">
SetHandler application/x-httpd-php
</FilesMatch>
<FilesMatch "\.phps$">
SetHandler application/x-httpd-php-source
</FilesMatch>
続いて、テスト用のソースを作成する。
手順は以下のように。
$ mv /usr/local/apache2/htdocs/index.html /usr/local/apache2/htdocs/index.html.default

#テスト用PHPソース作成
$ touch /usr/local/apache2/htdocs/index.php

#テスト用PHPソース編集
$ vi /usr/local/apache2/htdocs/index.php
テスト用ソースはこちら。
PHPの情報を表示するだけのシンプルなもの。
<!--PHP情報表示-->
<?php phpinfo(); ?>
最後にApache HTTP Serverの再起動を行う。
#Apache HTTP Serverの再起動
$ /usr/local/apache2/bin/apachectl restart
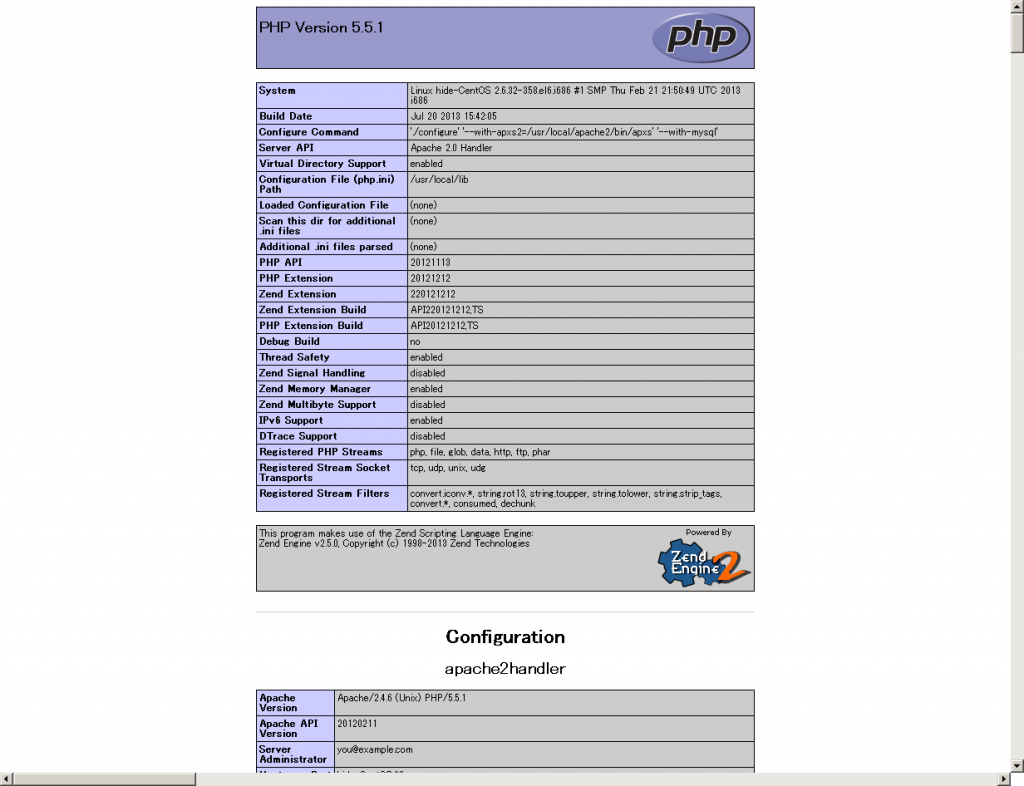
以上の設定で、「http://CentOSのIPアドレス/test.php」で、無事にPHPのバージョン情報が表示された。
表示内容はこんな感じです。


コメント